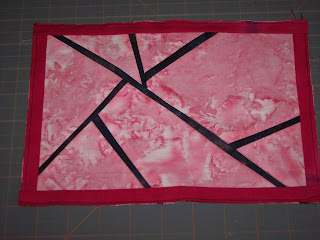
OK I've heard from many people they don't know what to make for AAQI. The Alzheimer's Art Quilt Initiative seeks original small art quilts to raise money for Alzheimer's research. They don't feel like an artist and are unsure of where to begin. OK you can use a purchased pattern IF you have written permission. But this one is SO easy, give it a try.
Broken Windows- took me 45 minutes at the exaggerated most. That's fabric selection, ironing, cutting, and piecing. It is super easy.
Materials: (use fabrics you have!)
10 x 8 textured pink for window
2 strips chocolate brown cut 3/4 inch x 27 inches
1 strip fuchsia 1inch x 36 inches
cherry blossom cut 2 strips 71/2 x 2 and 2 strips 14 x 2 for border
1) Take the 10 x 8 pink and slice it in half diagonally. That gives you 2 triangles.
Then make 2 cuts in EACH triangle. I made 3 in the bottom triangle and that was too much. The more cuts means the more seams and they can get grumpy.
2) To make life easier, make tick marks in the seam allowance to tell you which seams are sewn together. It looks like a puzzle, but you don't want to figure out what goes where. I drew on the photo. My actual tick marks were in a pink fabric marker and would not show up in the photo.
As you can see there are 2 sections separated by the center cut. You will sew section A (top section) together then section B ( bottom section) and finally you will sew the two sections together. Because this is a wonky type block, exactness isn't necessary and bias shouldn't be an issue. The block will be trimmed later. Now, on with the directions.
3)Take the strip of chocolate brown and sew it to the top 2 triangles in section A. Always use a 1/4 in. seam.
Don't laugh at my crazy circle! When you sew the strip on go all the way down the long edge, past the shorter edge. Then trim. Sew the rest of the pieces in section A. Then sew the seams in Section B. It should look like this:
4) Iron carefully, get those seams flat. Then sew the last chocolate strip to section A and then to section B.
5) Iron it again and trim the crazy out of it - to about 9 3/4 x 7 3/4.
6) Take the fushia strip and iron in in half lengthwise. This is for the flange. I love flange. It doesn't add to the size of the quilt, but it does add a nice bit of texture and a pop of color. Sew the flange to the edge of the quilt sides. Use a 1/8 inch seam. Trim. Sew the flange to the top and bottom edges of the quilt. Use the same 1/8 inch seam. All edges should be even. trim any little bits off.
7)Time for the border. Take one 71/2 x 2 inch piece and sew to one side of the quilt. Then sew the second 7 1/2 x 2 inch piece to the opposite side of the quilt. Iron and trim.
8) Take one 14 x 2 inch piece and sew to the top of the quilt. Take the last piece and sew to the bottom of the quilt. Iron and trim.
9) Ta Da...you now have a finished top to quilt, embellish, and bind as desired. It didn't take that long. If you know how to quilt it won't take as long as it will to read my directions!
Variations:
If I had a piece of landscape fabric (mountains or trees) that would make a nice window. Use it in place of the pink in the center.
Or if you like to make people laugh- use a piece of fish fabric and black for the 'leading'. That way it will look like a fish tank with a terrible crack!
It's a fun little quilt and super simple. If you make one and send it to AAQI let me know and send a picture...I want to see it! Good luck and sew for a cure.
Happy Quilting
Caren


No comments:
Post a Comment